Introduction
This blog is a good place to start if you’re just starting out with VOIP and want to run your own PBX, but note very well that it is just a getting started guide! This blog focus’s on how to setup a single PBX with two public telephone numbers that one can route to handsets (generally soft-phones on one’s mobile phones) for incoming calls, and for handsets to be able to make outgoing calls or internal calls whether those handsets are connected to the PBX internally or externally. For my proof of concept I’ve used a Single Board Computer (my SBC is a Raspberry PI 3B+) with Incredible PBX installed on the Raspberry PI. Although I’ve installed Incredible PBX (also known as PBXinaflash), there are many flavours of Asterisk/FreePBX based PBX’s that can be installed on many hardware platforms. What I’m writing here is relevant for all flavours of Asterisk/FreePBX based PBX’s.
The following picture shows the setup I am documenting in this blog.

The VOIP provider(s) will route all inbound calls for your telephone number(s) to your PBX, and the PBX will then route the call to a local handset(s)/softphone(s). The VOIP provider(s) will also route all outbound calls to external telephone numbers.
Scope
The scope of this document is basically mentioned in the Introduction. The scope is to explain how to connect handsets to a PBX to make internal and external calls.
Not in Scope:
Installation
Minimum HW requirements
How to trunk to potential Internal PBX’s (e.g. additional Incredible PBX’s)
How to encrypt phone calls
Video calling
Call recording
Combox features
Interactive Voice Response (IVR – “press 1 for English, drücken Sie 2 für Deutsch….”)
and much more.
Getting started
The first thing to do is to buy the right equipment and install the base system. You should find everything you need here – https://sourceforge.net/projects/pbxinaflash/files/IncrediblePBX2020%20for%20Raspbian%2010%20Buster/, and here “http://nerdvittles.com/” (at the time of writing, the exact “Nerdvittles” tutorial is documented in the “Sourceforge.net” link above). The Nerdvittles has a lot of excellent information, but a lot of that information I am not using. For example, I am not interested in Wifi, Fax, Mail, or how to configure trunks to North American VOIP providers, and I also have not followed all the Incredible PBX recommendations as I’m only doing proof of concept. For example, I am using a RPI3+ B with 1GB RAM and a 8GB SD card.
The nerdvittles documentation fails to point out that you should really use a static internal IP address, so I’ll explain here how I did it as it wasn’t as straightforward as I thought it would be.
I logged in through a terminal window and issued the command “ifconfig”. When I looked at the name given for my ethernet interface, it was “enxb827eb244acc”, and not “eth0” as I am use to. I changed this to “eth0” through “raspi-config”, selecting “Advanced Options”, “Network Interface Names” and disabling “predictable network i/f names” (the system will reboot after changing this setting). Alternatively you can use that long interface name, or take this interesting solution that I found – https://blog.agung.tech/post/2020-02-14-assign-interface-name-to-device/. Once Incredible PBX was available again I set the static IP address by editting /etc/dhcpcd.conf (nano /etc/dhcpcd.conf) and changed the following lines to meet my needs
# Example static IP configuration:
#interface eth0
#static ip_address=192.168.0.10/24
#static ip6_address=fd51:42f8:caae:d92e::ff/64
#static routers=192.168.0.1
#static domain_name_servers=192.168.0.1 8.8.8.8 fd51:42f8:caae:d92e::1
You will have to issue the command “service networking restart” for the change to take place, or simply just reboot the server again.
Many of you, like myself, will only have a single dynamic Internet IP address. For those of you that have a dynamic Internet IP address provided from your service provider, it is strongly recommended that you register and setup with a Dynamic DNS provider so you can access the Incredible PBX from the Internet with a name like “mypbx.acme.com” instead of your WAN IP address which will change from time-to-time. There are plenty of Dynamic DNS providers to choose from.
Another thing I have done differently compared to the Nerdvittles documentation is that I have not opened any incoming ports for SIP traffic on my firewall. Instead I have just opened the IAX2 port, UDP port 4569 which is required for my soft phones. You might be asking yourself how can SIP trunking to my VOIP providers work. This works because I have one free single telephone number per provider, and I am connecting from my Incredible PBX to the provider, and like most home user firewall configurations, all ports outbound are open. My Incredible PBX always keeps the connection to the SIP service provider alive. If you want to open incoming UDP ports 10000-20000 and UDP ports 5060, 5061 for incoming SIP so you can use SIP soft phones go ahead, but I’m not covering that in this blog. With an incoming SIP configuration one has a much wider range of soft phones one can use, but I want to use IAX2 softphones. I use Zoiper as my softphone as it can make calls using the IAX2 protocol as well a the SIP protocol. Zoiper is available for Android and IOS mobile phones and tablets, and one can also install it on your Windows, Apple, Linux laptop.
One last thing to mention, that Nerdvittles fail to mention is “SIP-ALG” (Session Initiation Protocol – Application Layer Gateway). “SIP-ALG” is implemented on most modem/routers. In general it should be disabled. If you want to understand more about “SIP-ALG” there are plenty of explanations to be found on the Internet.
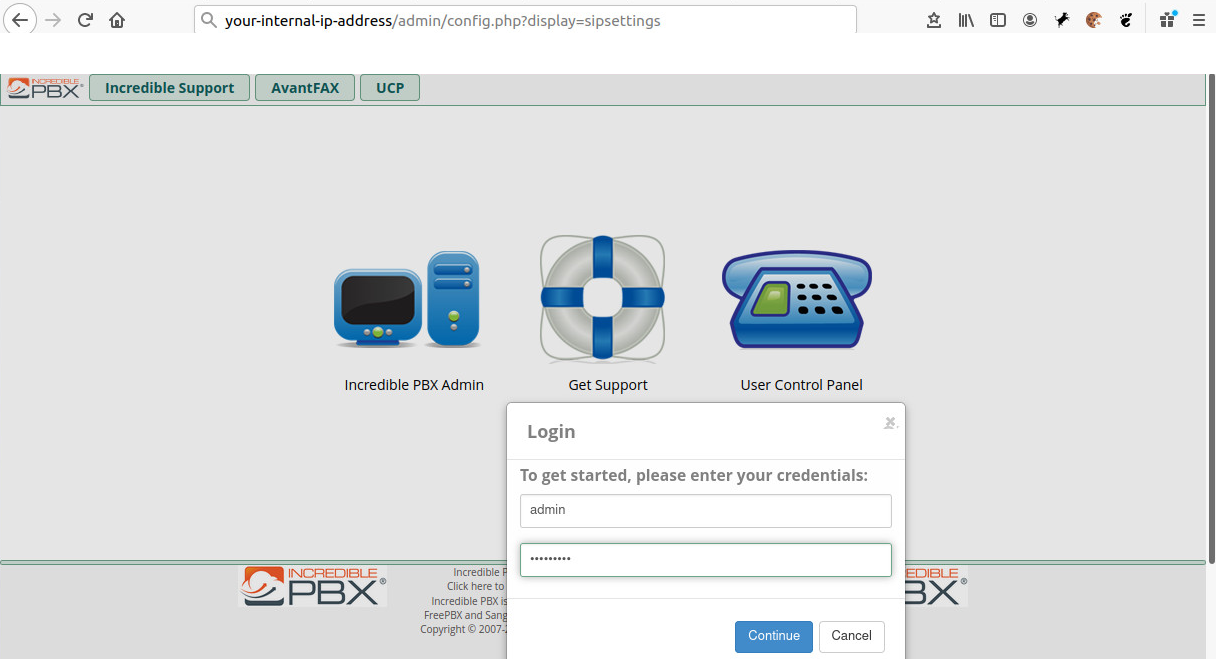
Configuration
Configuration is done by pointing your browser at the internal IP address of your Incredible PBX and logging in as admin. If you do not know your password you skipped an important part in the Sourceforge/Nerdvittles documentation, like myself. 🙂 To set the “admin” password you’ll need to logon to the Incredible PBX server, using SSH, as the “root” user and run “./admin-pw-change”.
I intend to use as many graphical illustrations as possible to show you how to configure and to only explain the essential settings.
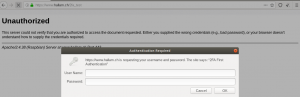
The Incredible PBX logon process for administrators.
- From your PC/laptop/notebook point your browser to “http://your.incredibles.pbx.ip.address/
- Select “Incredible PBX Admin” for the credentials login dialogue
Once logged in I set about removing a lot of the settings that Incredible PBX had put in place to various North American SIP providers. Although the settings (generally trunks) are disabled I didn’t want irrelevant settings hanging around. You can leave them there if you want but it just was a nuisance for me.
The first thing to do is to take 2 smartphones and install a SIP client App on both of them. There are many Apps out there but I’ve chosen Zoiper because I want a client that works with IAX2 besides SIP. As I explained earlier, it’s far easier to work with IAX2 when trying to connect your handsets through a firewall. With the App Zoiper one can connect via SIP or IAX2.
Now it is time to make a simple call so lets configure one handset with Zoiper SIP with extension number 201 and the other handset as Zoiper IAX2 with the extension number 202. NOTE: I’m starting from 200. I’ve done this deliberately as a lot of countries use numbers in the 100, 800, 900 range as special numbers. One should think about how one assigns extensions numbers as one might want to assign numbers to different groups or regions, for example 200-299 for sales, 300-399 for support, etc. Or in future one might like to route a set of numbers to another PBX (trunking). Anyhow, I recommend you follow this blog for the time being.
Setup SIP extension 201
Click on the tab “Applications” and select “Extensions”
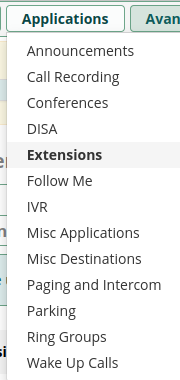
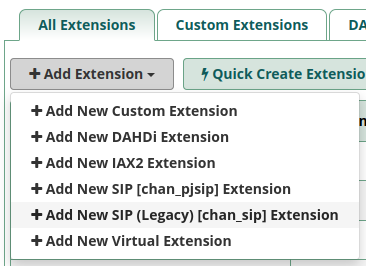
Once the Extensions screen is displayed, under the “All Extensions” tab, select “+ Add Extension”, “+ Add New Sip….”. NOTE: I recommend one chooses “Add New Sip (legacy)….” to start with. The reason being is that Incredible PBX is setup to use the default SIP port (UDP port 5060) for legacy SIP. For pjsip extensions Incredible PBX defaults to a non-standard UDP port 5061. Once again, I recommend you follow this blog and experiment later with pjsip settings.
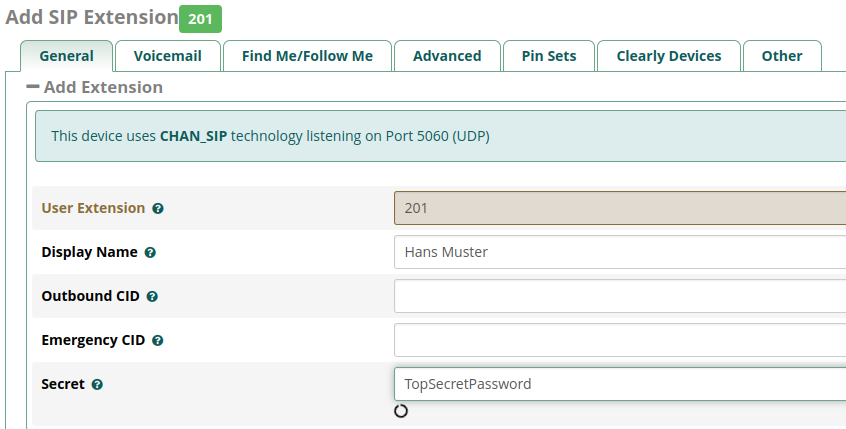
On the “Add SIP Extension” screen you only need to fill in 3 fields (or 2 if you accept the “Secret” offered). The “User Extension” will be “201” for the purpose of following this documentation. The “Display Name” is free text but using your name makes sense, maybe for testing a good display name would be “Your Name SIP”. The “Secret” is the password you want for extension 201.
- Enter a User Extension – “201”
- Enter a “Display Name” – “Your Name SIP”
- Enter a “Secret” or accept the Secret offered.
- Select “Submit”
- Select “Apply Config”
Make sure to “Submit” your input and “Apply Config”.
Setup IAX2 extension 202
The process is the same as above except, of course, one would be adding an IAX2 extension, using “202” as the “User Extension”, and using a “Display Name” of “Your Name IAX2″ . For testing I always use the same “Secret” to simplify things.
Setup SIP or AIX2 Softphone using the App Zoiper
So as to keep this getting started guide as simple as possible, I’m showing you here how to simply connect internal Softphones using the internal IP address of the Incredible PBX server.
NOTE: I actually connect using the hostname by which my Incredible PBX server is known as on the Internet (e.g. pbx.acme.com), but this guide is to get you started so please stick to using the IP address for ease of following this blog. Once again, my recommendation is to experiment and perfect things later.
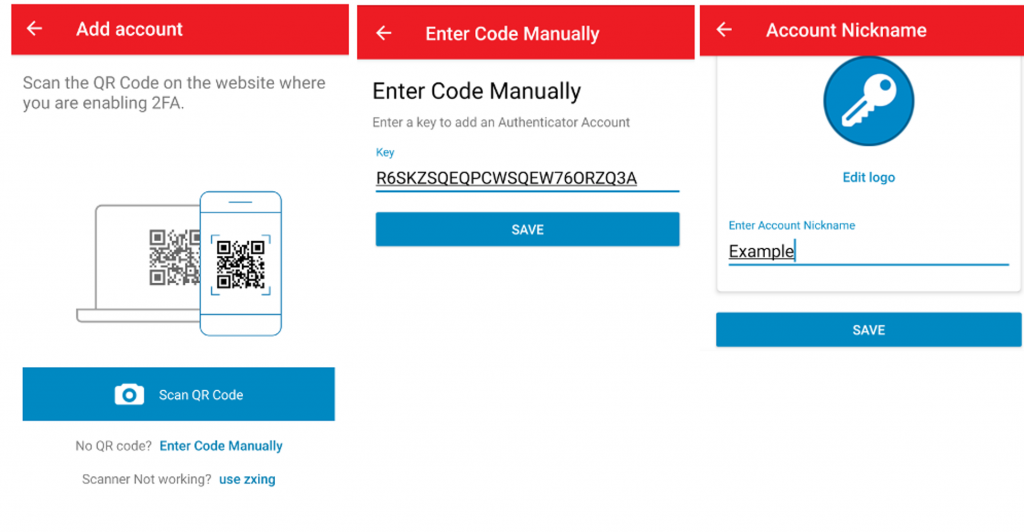
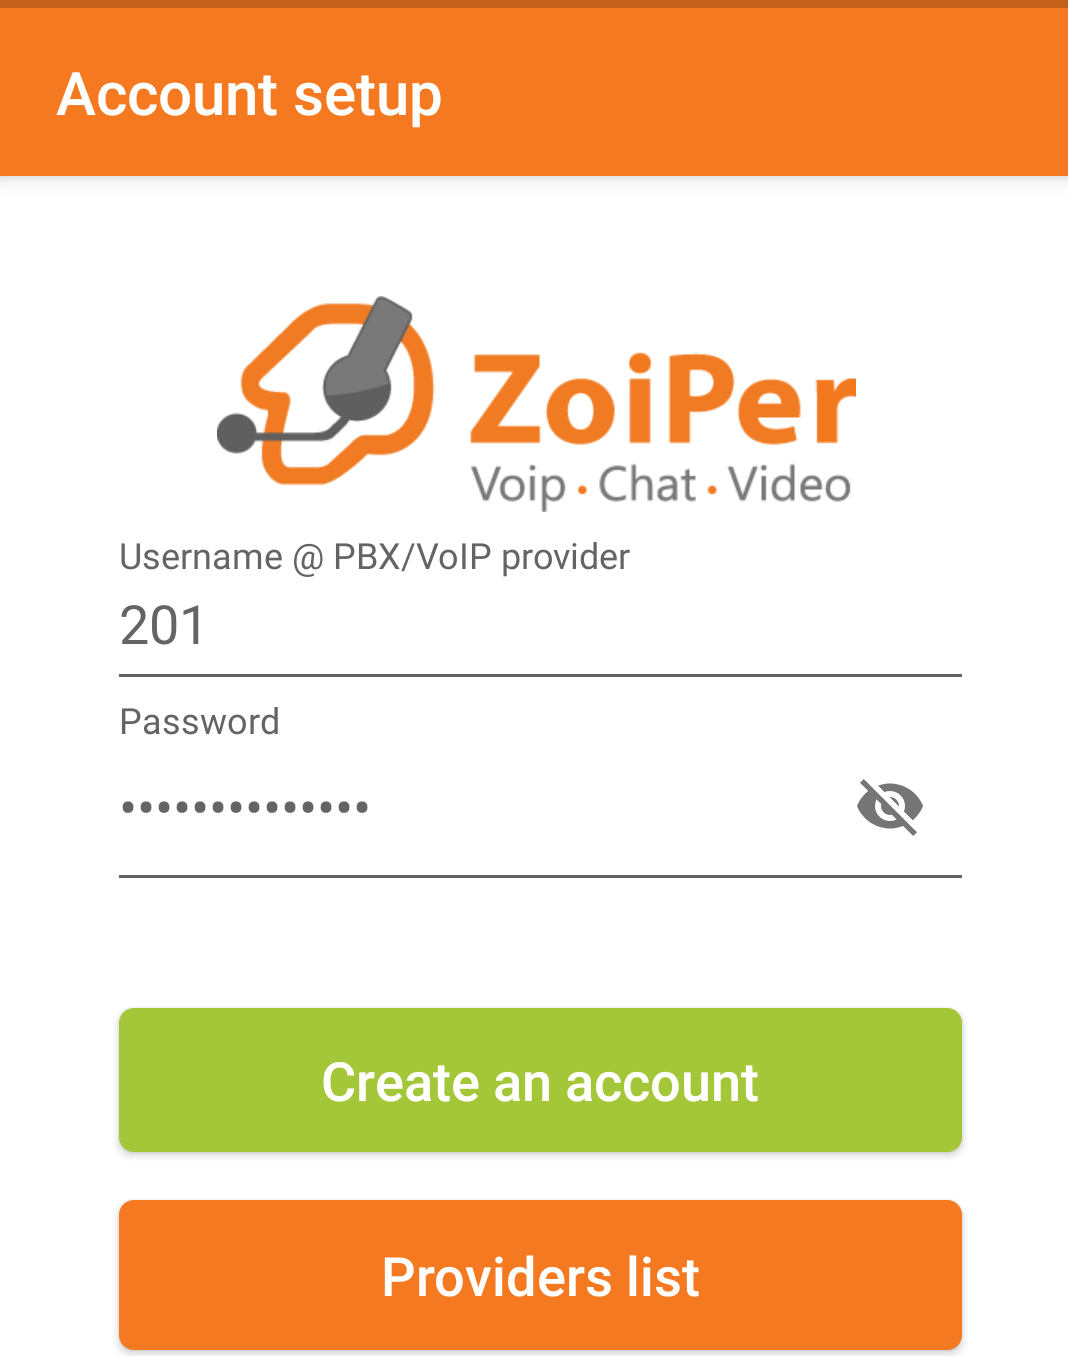
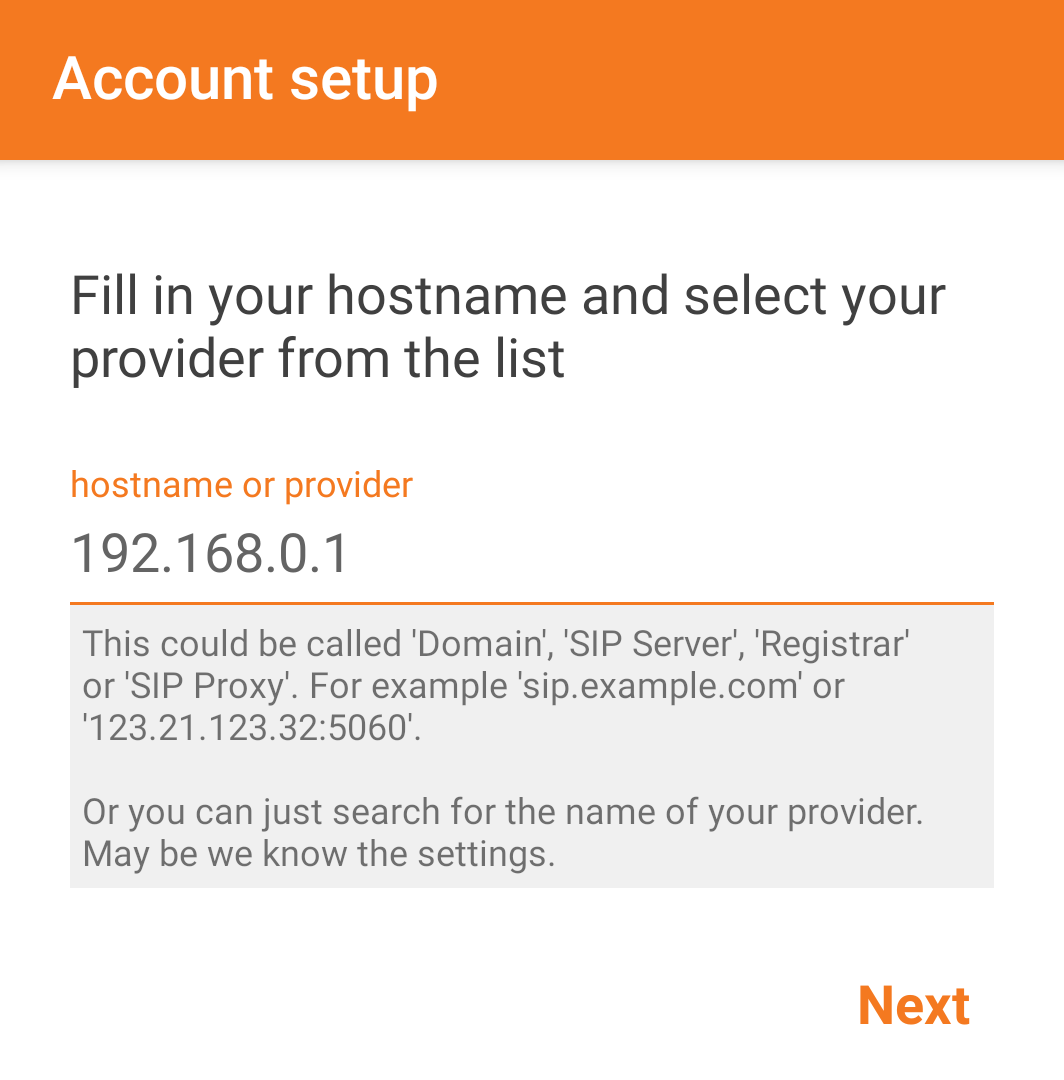
Here is a graphical explanation of how to connect your Zoiper Softphone to SIP extension 201. On starting Zoiper for the first time you will be asked to setup an account
- Username is the extension number, so in our example “201”.
- Enter the password (the value in the “Secret” field) for extension “201”.
- Select “Create an account”.
- Enter the internal IP address of the Incredible PBX server.
- Select “Next”.
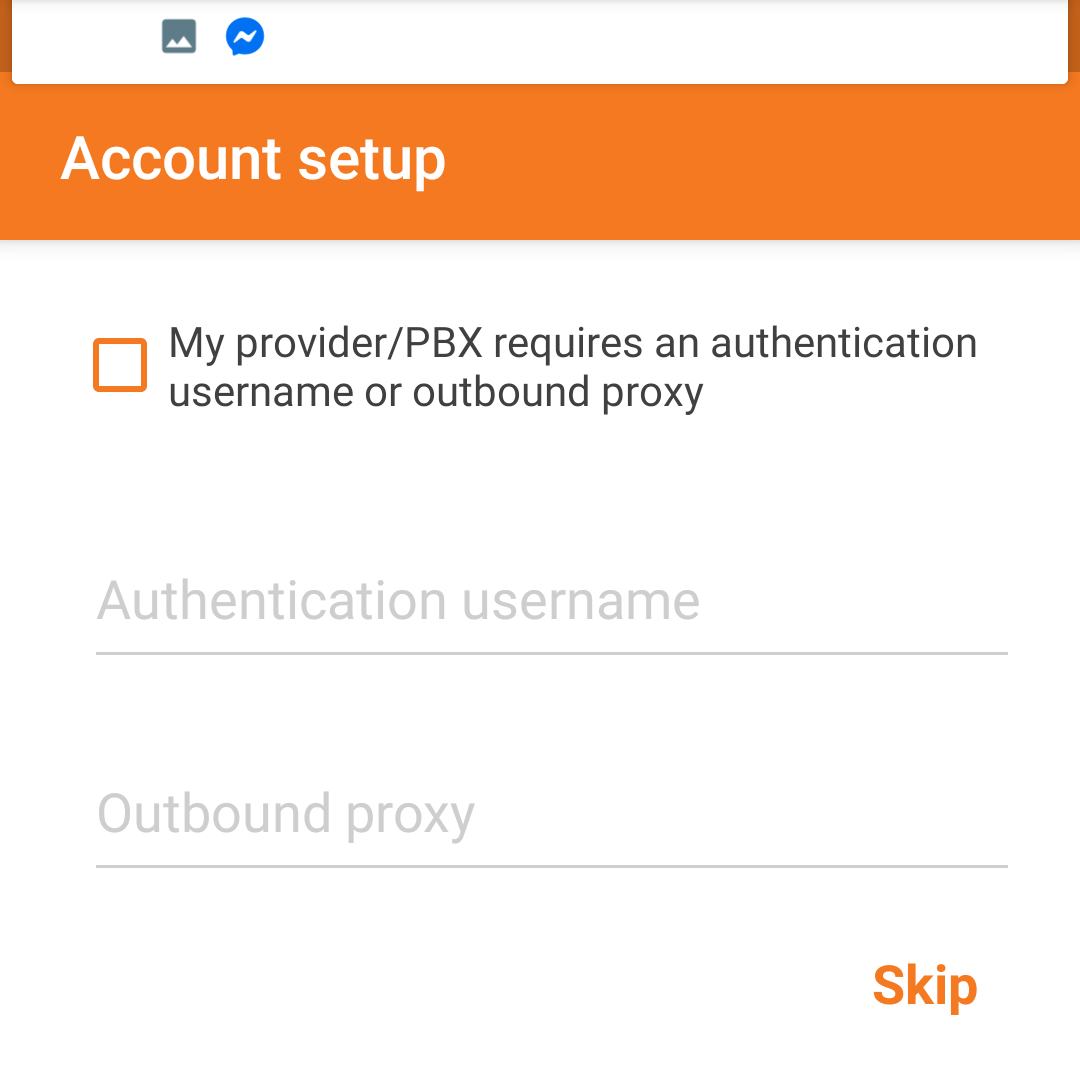
- Select “Skip”.
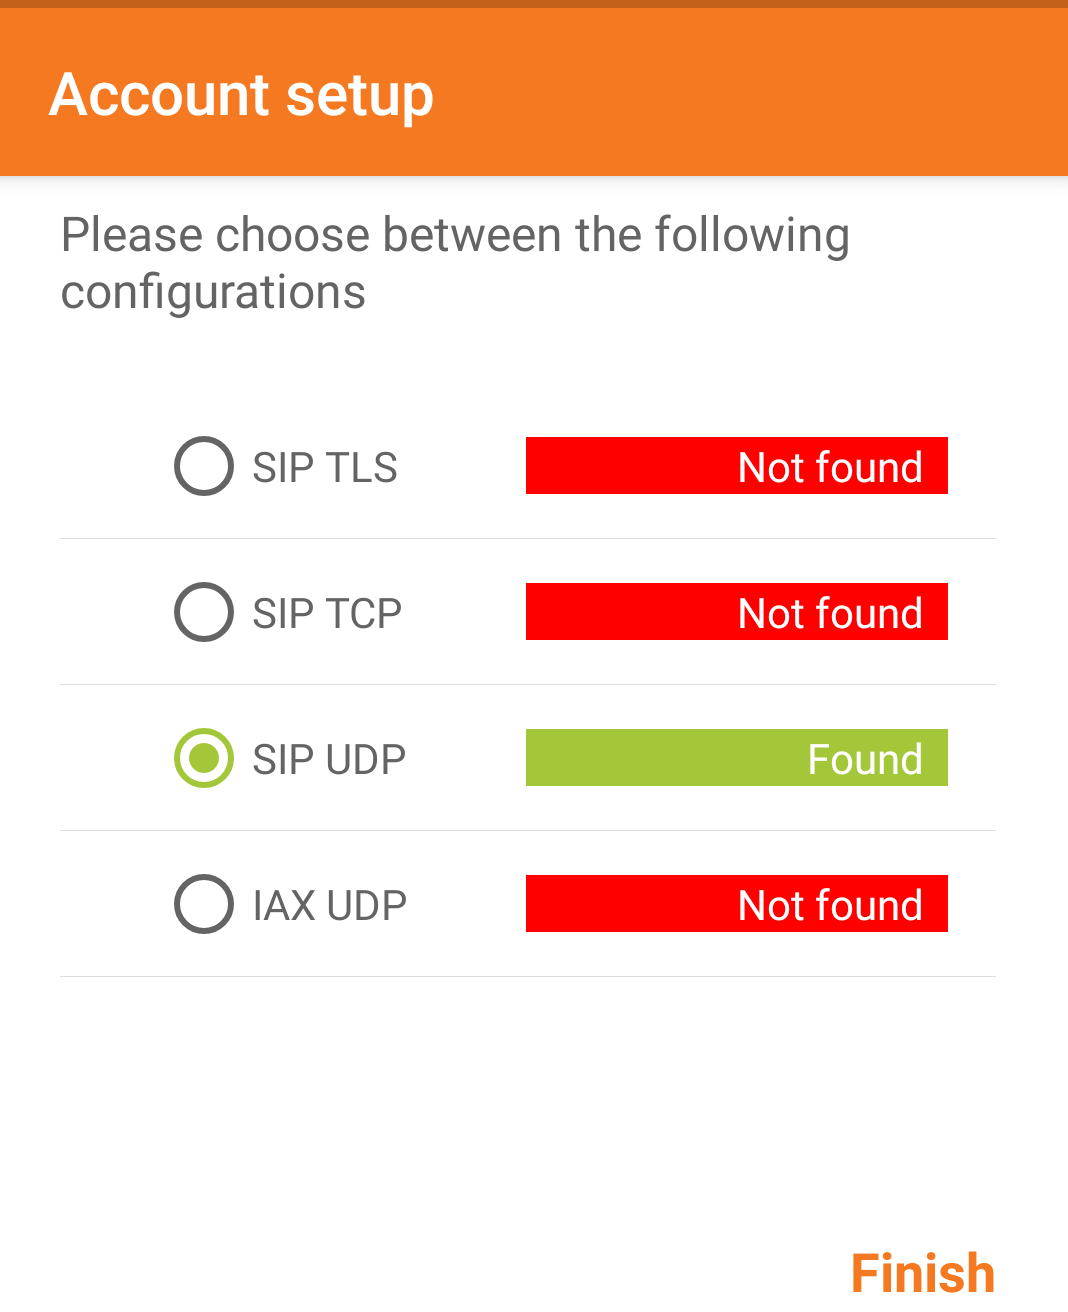
- Select SIP UDP (should be the only option automatically selected if one is following this guide).
- Select “Finish”.
Now take your second Softphone and set up Extension “202” exactly the same way. It should be automatically recognised as an IAX UDP phone. You are now ready to test internal phone calls by making calls from 201 <-> 202.
Trobleshoot
If you cannot make 201 <-> 202 internal calls, check that the Softphones registered fine.
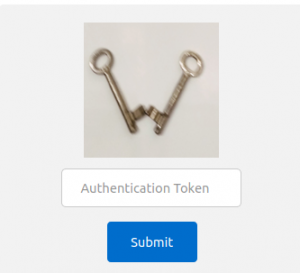
- Start the Zoiper Softphones.
- Select the 3 parallel bars

After the selecting the 3 parallel bars next to “Search ….” you should get a screen like this
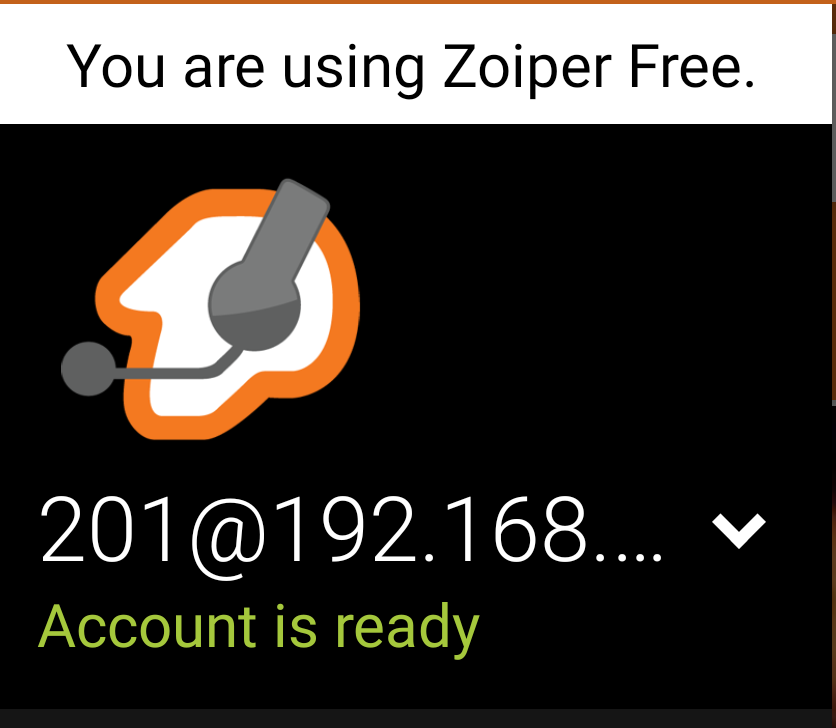
If you don’t have the “Account is ready” then check the “settings” (or delete and create the account again), or logon to the Incredible PBX server and check within asterisk, or look at the log. I prefer to look at the log with the command “tail -f /var/log/asterisk/full”. One can also debug/troubleshoot within Incredible PBX with the command “asterisk -rv”.
Trunk Configuration to Public VOIP provider
Here I have “cheated” a bit. I use two Public VOIP providers here in Switzerland, but have not paid for trunking. I have one “pay as you go” number from each provider which, I believe, makes a small difference to how your trunk is setup. Also, I believe, this is the reason why I don’t have to open up many incoming ports on my firewall for SIP connectivity. Please note that I have written “I believe” as I have never proved this! You will also notice that the VOIP providers I am using here in Switzerland are two excellent providers, Phonestar and Sipcall.
There are many settings but the majority can be left at their default values. It’s possible that these settings might not work for your provider, but should work for most.
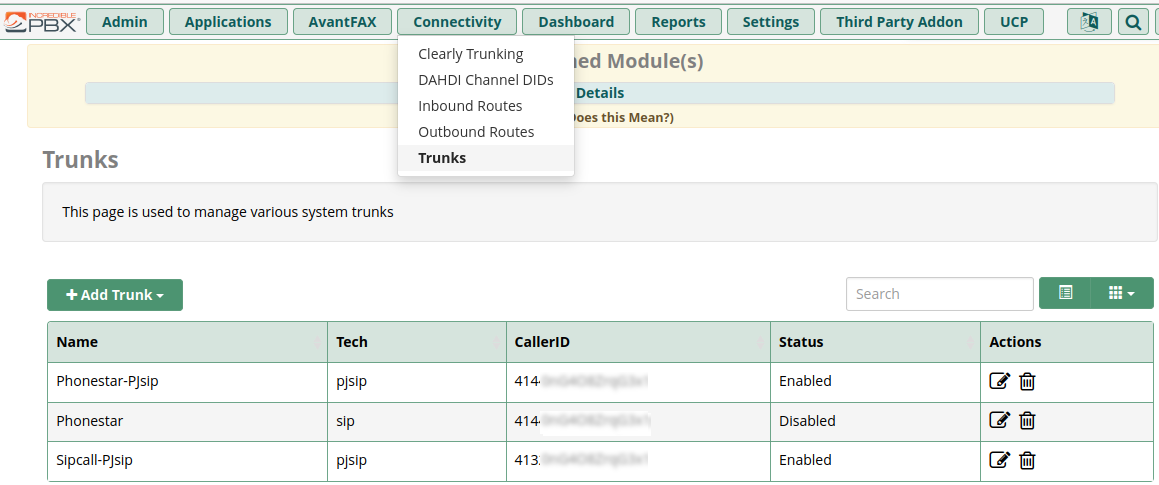
- Select Connectivity/Trunks
- Select “+ Add Trunk”
- (most probably) select “+ Add SIP (chan_pjsip) Trunk”
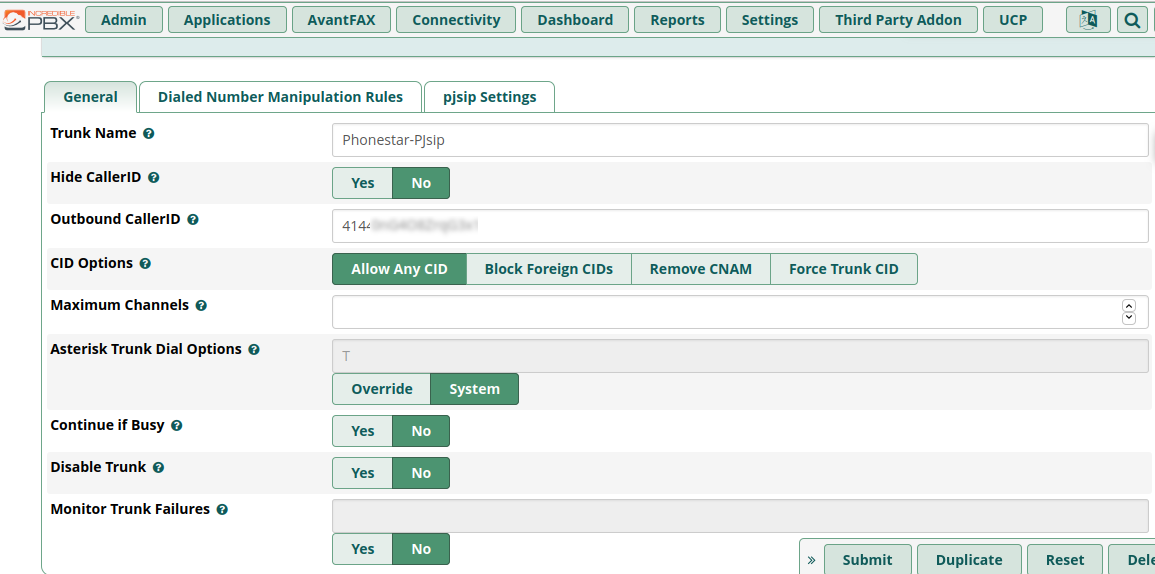
On selecting “+ Add SIP (chan_pjsip) Trunk” should take you to the following screen where, on the “General” tab you:
- Provide a meaningful “Trunk Name”.
- Provide a “Outbound Caller ID”. Commonly your phone number.
- Click “Submit”
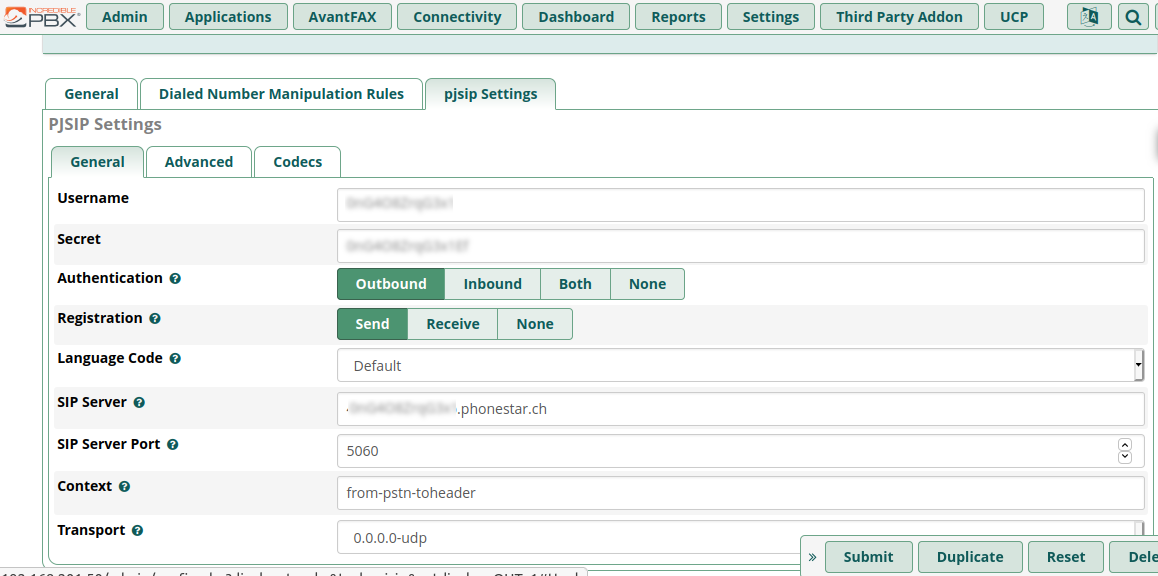
Next, select the “pjsip settings” tab
- Enter the Username/Secret provided by your VOIP provider.
- Enter your SIP Server provided by your provider.
- Enter SIP Server port which is normally 5060
- Enter Context “from-pstn-toheader”. NOTE: the default for Context is “from-pstn” is what I believe would be correct if one had actually subscribed to trunking from the VOIP provider.
- Click “Submit” then click “Apply Config”
To see if this is working, login to your VOIP provider administration web-site and see whether your Incredible PBX has successfully registered. Alternatively look in the log file for the appropriate log entry.
We now are at a point where we can make internal calls and we are connected to the VOIP service provider(s).
Calls between handsets outside the internal network
As mentioned in the “Getting Started” Section, I have decided not to open a load of ports on my firewall router, so SIP softphones can’t connect to my Incredible PBX server from the the Internet, but I have opened one port so that Zoiper IAX2 configured softphones can connect. The port to open on your Router is UDP port 4569 and connect it to your incredible PBX server.
The configuration for your IAX2 softphone is exactly the same as explained in “Setup SIP or AIX2 Softphone using the App Zoiper”, but you will need to use the Internet facing IP address of your Router.
NOTE: As explained earlier, I don’t have a fixed Internet IP address so I use Dynamic DNS and a typical Internet styled host name like “pbx.acme.com” to connect to my Incredible PBX. This enables me to use a single configuration for my smartphone regardless of whether I’m on my internal network or Internet. Setting up Dynamic DNS is outside the scope of this blog.
Now we need to handle outgoing calls – e.g. An internal Softphone wants to make an external call. We also need to know how to handle incoming calls from our VOIP provider(s) – e.g. Someone, somewhere in the world, wants to call you on your number. Before we do this make an adjustment to the SIP settings.
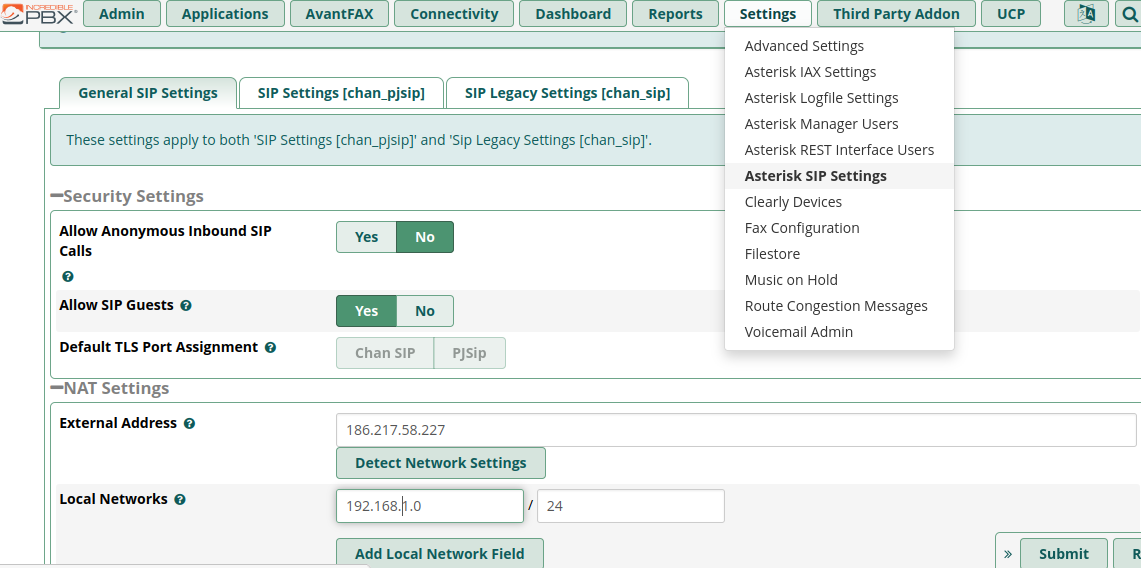
Adjust SIP Settings
- NAT Settings enter the “External Address” (the Internet host name), or click on “Detect Network Settings” which should fill in the field automatically with the Internet IP address.
- Enter “Local Networks”
- “Submit” and “Apply Config”
Outbound Call Routing
- Select the tab Connectivity and the option “Outbound Routes”
- Select “+ Add Outbound Route”
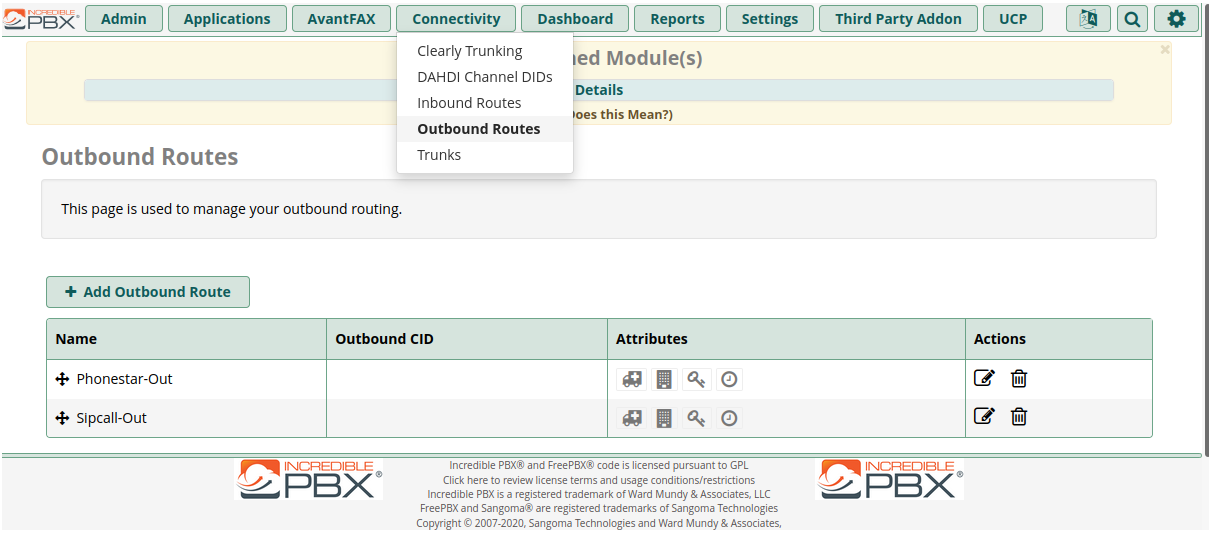
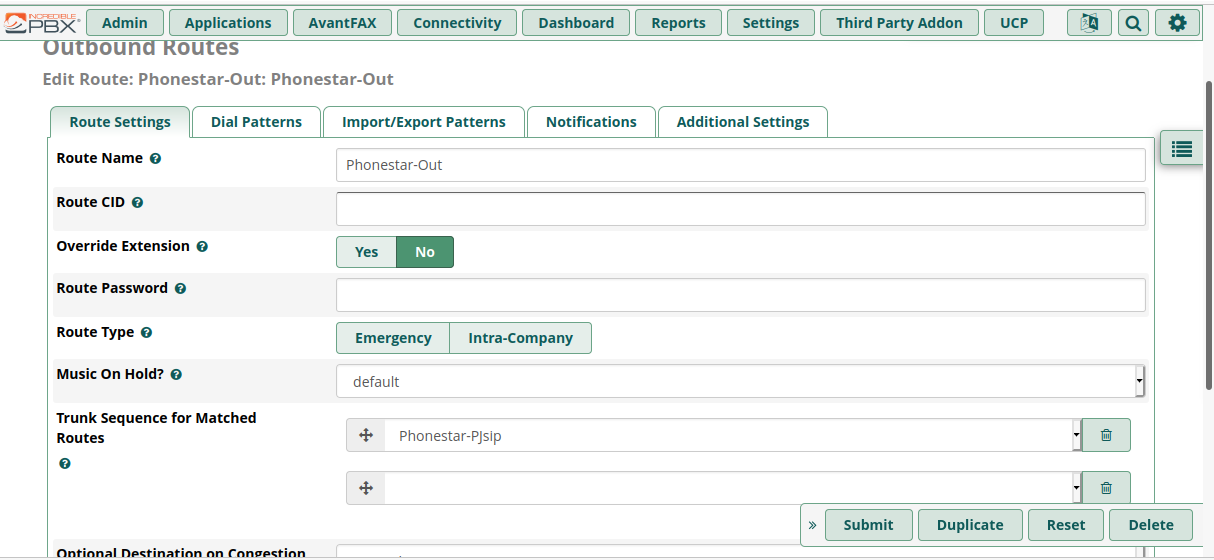
Following is how I added the Outbound route for one of my VOIP providers (Phonestar).
- Select “Route Settings” tab
- Fill in the field “Route Name” with a meaningful name of your choice
- Select from the drop-down “Trunk Sequence for Matched Routes” the trunk you previously created.
- Select “Submit”
- Click on the “Dial Patterns” tab
- Enter [+0]xx. in the match pattern field
- Select “Submit”
- Select “Apply Config”

One may need to study dial patterns closer to meet their full needs. The dial pattern I have used indicates that all calls starting with “0” use this trunk. The simple logic being any call starting with any digit from “1 – 9” remains within Incredible PBX, and any call starting with “0” is passed over to my VOIP provider. As always, stick to doing what is in this blog and experiment later.
For those that noted there is a “#1” in the prefix field, this is there because I use Sipcall as the default VOIP provider for outgoing calls (so no prefix). With the #1 the Phonestar trunk will be used and not the Sipcall trunk. Therefore, instead of dialling “0441234567”, I would dial #10441234567″.
Test by making a call to any number starting with “0”. If you have problems do troubleshooting as mentioned previously. Also don’t forget the problem might be your “Sip-ALG” setting on your firewall.
Hopefully one now has internal calls and outbound calls working fine, so let’s get the last step working, inbound calls.
Inbound Call Routing
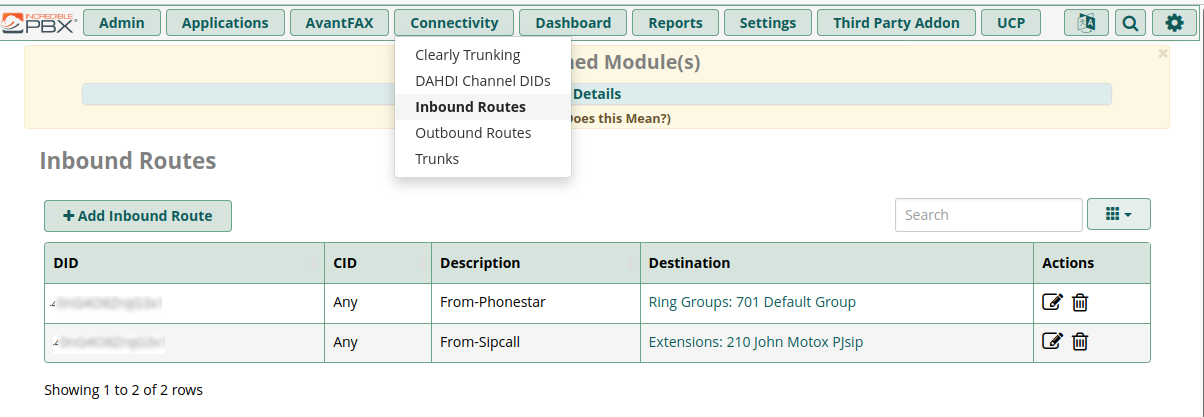
You will notice that for an incoming call from my Sipcall trunk, I route the call to a single extension (NOTE: I’ve got more extensions defined than just “201” and “202” that I’ve used in this blog). For incoming calls from my Phonestar trunk, I route the call to several phones (Ring Group). I am not going into details about creating Ring Groups, but will mention that you can create “Ring Groups”, by going to the “Applications” tab and selecting “Ring Groups”.
Inbound Call Routing
For initial testing only set up an Inbound Route for one of your VOIP providers.
- Select the tab “Connectivity” and then “Inbound Routes”
- Select “+Add Inbound Route”
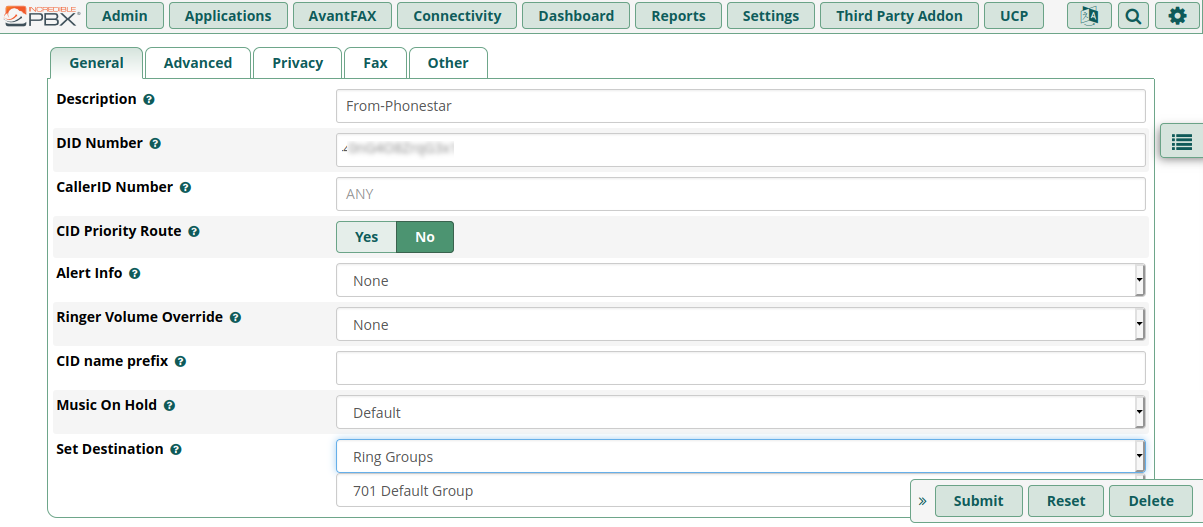
- Select the “General” tab
- Provide a meaningful “Description”
- Leave “DID Number” field empty for initial testing (I’ll explain providing a DID later)
- “Set Destination” to “Extension” then choose the extension number to be rung – e.g. “201” or “202”
- Select “Submit”
- Select “Apply Config”
Test incoming calls are working by calling your VOIP telephone number from your mobile or landline phone for example. Make sure you are not using your mobile phone that you have also setup as a softphone to receive calls! 🙂
Any problems, do the troubleshooting I keep mentioning and don’t forget that it could be your firewall Sip-ALG setting.
Inbound Call Routing using DID (Direct Inward Dialing)
The DID is provided by your VOIP provider. If you have multiple VOIP providers then quite possibly you will want to route information dependent on whether the external caller dialed number “A” or number “B”. If you want all Inbound calls to be routed to the same phones, regardless of what number was dialed then you don’t need to concern yourself with “DID Number” and just leave the “DID Number” field blank.
If you do want to do Inbound routing dependent on what number is called, you have to make an Inbound Route for every DID (in my case every VOIP provider) like I have done.
The graphic again showing my 2 inbound routes
I had problem with defining the DID. As I explained earlier I had to change the “context” setting on the trunk. Here is a snippet of what I wrote from setting up your trunk:
- Enter Context “from-pstn-toheader”. NOTE: the default for Context is “from-pstn” is what I believe would be correct if one had actually subscribed to trunking from the VOIP provider.
You can see if your Incredible PBX server is finding the DID by looking at the logs. If things aren’t working when you have defined a DID, you’ll probably get what I was getting in the log which was the word “Forbidden”. If you are getting “Forbidden”, then maybe your VOIP provider isn’t sending a DID, you need to change your context to “from-pstn”, or you entered an incorrect DID. If/when it is working correctly you will see lines with “your-DID@from-pstn” in the log. Example – “41192462386@from-pstn” where “41192462386” is your DID. NOTE: if you have subscribed to trunking from your VOIP provider, which I haven’t, your DID’s are probably much shorter with 3 or 4 digits.
Conclusion
Although there are many features not covered, and the features covered only cover the essentials to get going with Incredible PBX, I trust one has learned a lot and is inspired to look deeper into Incredible PBX/Asterisk.
Have fun! 🙂