
If you are wanting to access your home network from the Internet, then you really should strongly consider security. Although accessing your servers by using a unique username and a strong password is still very popular there is still a small amount of risk involved. The more you can reduce the risk the better. In this blog I’m going to explain how I access my computers at home from the Internet.
As the title suggests, I use Secure Shell for remote access to either manage my computers (SSH login) or to shift files backwards and forwards (SFTP). You can find many articles telling you that using an SSH key pair is just like having two factor authentication (2FA), but I prefer to go for the security of a typical username/password login followed by a 2nd authentication using TOTP (Time based One Time Password) with a 2nd device, the 2nd device generally being a mobile phone with an APP (you will also hear this referred to as a soft token).
The first time I installed the SSH daemon (SSHD) with 2FA, I installed SSHD with Google Authenticator. Although it worked fine I couldn’t get it to work with SFTP clients logging into an SFTP jail, so I looked and found an alternative method which I prefer as it is totally Open Source, and of course it did what I wanted. I used PAM_OATH.
Installation & Configuration
My Linux server is Debian based, so here are the steps I did:
- Install pam_oath and oathtool
sudo apt-get update
sudo apt-get upgrade - Edited /etc/ssh/sshd_config
ChallengeResponseAuthentication yes
UsePAM yes - Restart the SSH Daemon
sudo service sshd restart - Now generate a hexadecimal key that will be put into the file users.oath
head -10 /dev/urandom | md5sum | cut -b 1-30
this will provide a 30 character result. An example result 8fa4acca0483c5694096ff9d1cc360
Using this result populate /etc/users.oath with a line like this:
HOTP/T30/6 yourusername – 8fa4acca0483c5694096ff9d1cc360
Make sure that /etc/users.oath is only accessible by root, so enter the commands –
sudo chmod 600 /etc/users.oath
sudo chown root:root /etc/users.oath - Now we need to note the base32 result of the hex key. One can do this using a Hex to Base32 converter, but the recommendation is to use oathtool and issue the command –
oathtool –verbose –totp yourhexkey, so using our example hexadecimal key from above, oathtool –verbose –totp 8fa4acca0483c5694096ff9d1cc360 The result will display, amongst other things, the line “Base32 secret: R6SKZSQEQPCWSQEW76ORZQ3A”. - Now go to your device (most likely your mobile phone) and install the App. I generally use the App Aegis, but you can use Google Authenticator, Authy, FreeOTP, just to name a few. Open the App and add an account. Here are a few pictures to give you an idea of how to add an account using the App “Authy”.
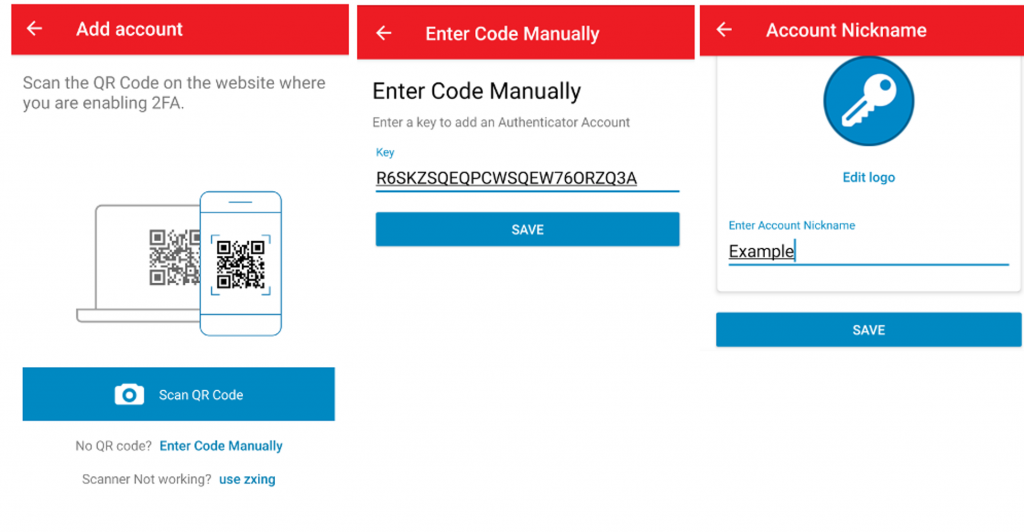
Note: in “Add account” select “Enter Code Manually” - Now we need to activate things. On my Debian based distribution (Raspbian), I editted /etc/pam.d/sshd and added the line –
auth required pam_oath.so usersfile=/etc/users.oath window=30 digits=6 as the last line. - Now it is time to test. Stay logged on to your server just in case you have done things wrong, the follow this procedure:
1. Open a new terminal window on your client device. Your PC, another PC, or Smartphone for example.
2. Open the App on your second device (so mobile phone with Authy, Aegis, GoogleAuthenticator etc.) so you are ready with your Time based OTP.
3. Open a new SSH session from your terminal window to your server and login.
It should look something like this –
ssh username@yourserver
Password:
One-time password (OATH) for `username’:
Last login: Fri Apr 10 13:09:55 2020 from yourhost
username@yourserver:~$
CONGRATULATIONS! It works
- There is one thing you probably will want to do, and that is to avoid 2FA on your local network(s) for your trusted users. To do this create a file to exclude networks. I created the file /etc/security/access-local.conf and the contents of it are –
+ : ALL : 192.168.1.0/24
+ : ALL : LOCAL
– : ALL : ALL
so the network 192.168.1.x and localhost will be excluded.
To make this active update /etc/pam.d/sshd again by inserting a line just before the line you added above. The last 2 lines will now look like this –
auth [success=1 default=ignore] pam_access.so accessfile=/etc/security/access-local.conf
auth required pam_oath.so usersfile=/etc/users.oath window=30 digits=6
Be sure to test again.
At this point we are basically finished, but it’s really worthwhile fully understanding how it works and the extra configuration options.
For those wanting to know more, I’m going to carry on and show you how to create a user-friendly QR code, and explain why I believe one should add even more security.
Creating a QR
It’s much more user friendly to give your users a QR (Quick Response) code image to scan using their 2nd device/mobile phone. Here is a typical QR code image for my example above with the Base32 secret “R6SKZSQEQPCWSQEW76ORZQ3A”. 
This was created with the command qr “otpauth://totp/username@yourserver?secret=R6SKZSQEQPCWSQEW76ORZQ3A” > exampleQR.png
How to Install and execute QR Code Image Generator
I’m sure one could find a nice web-interface to do everything for you, but here I’m going to explain how I generate my QR code.
I have Python installed on my server so I’m using the Python tools for QR Code Image Generation. For this I will need to install qrcode and pillow. To do this execute the following from the command line –
sudo pip install qrcode (or sudo pip3 install qrcode for Python v3)
sudo pip install pillow (or sudo pip3 install pillow for Python v3)
Now you can make the image with –
qr “otpauth://totp/username@yourserver?secret=R6SKZSQEQPCWSQEW76ORZQ3A” > exampleQR.png
NOTE: the above is a single line command!
This command is the very basic and a few assumptions are made with this command (e.g. number of digits for the TOTP will be 6 and the time expiration will be 30 seconds).
After you have run the command you just need to display the image, exampleQR.png in our example, and scan it with your App
I’ve given you the basic information that should be good enough to get you going but it’s probably worth your while understanding the URI format of otpauth (e.g. understand “otpauth://totp….” and the parameters).
Additional Security (Fail2Ban)
If you were to look at the number of connection attempts from the Internet you’d be surprised at how many people, robots, are trying to crack your username and password and break into your server. Take a look at how many are attempting to break in with the command –
sudo lastb -a | less
On my SSH server I have attempts from addresses that have been trying for months, so would be trying continually many times a minute if fail2ban were to be inactive. With fail2ban you can ban an IP address after the configured amount of attempts for a configured amount of time.
Fail2ban Installation and Configuration
Installation is very straightforward irrespective of Linux distribution. So for a Debian based distribution just do –
sudo apt-get update
sudo apt-get upgrade
sudo apt-get install fail2ban
If you want to play around with the default configuration of fail2ban then copy fail2ban.conf to fail2ban.local and make changes in this file. The fail2ban.local settings will override the fail2ban.conf settings. I didn’t bother creating a fail2ban.local as I was happy with the default setting for such things as where to place the log files, the verbosity of logging, the file to contain the PID number etc.
Where you will most probably want to play around with the configuration is within jail.conf. To do this copy jail.conf to jail.local – sudo cp /etc/fail2ban/jail.conf /etc/fail2ban/jail.local – and change the settings in jail.local. You’ll notice that there are settings for many protocols beside SSH, but we’re only interested in the settings for SSHD. I’m no Fail2ban expert so I’m only going to show you example settings for SSHD which are very similar to what I use –
[sshd]
# To use more aggressive sshd modes set filter parameter “mode” in jail.local:
# normal (default), ddos, extra or aggressive (combines all).
# See “tests/files/logs/sshd” or “filter.d/sshd.conf” for usage example and details.
#mode = normal
enabled = true
filter = sshd
port = ssh
banaction = iptables-multiport
bantime = 60m
maxretry = 2
ignoreip = 192.168.1.0/24
logpath = %(sshd_log)s
backend = %(sshd_backend)s
The only lines that interest me are the lines “bantime”, “maxretry” and “ignoreip”. Using the example above any user within the local network, 192.168.1.0/24 in my example, is excluded. This means they can try numerous times to login. Anyone trying to login from the Internet can enter false credentials 2 times (maxretry), but will be banned from trying for 60 minutes (bantime) if the 3rd attempt is false. Don’t forget to reload the fail2ban configuration after any change –
sudo service fail2ban reload
Further Thoughts and Information
Maybe you are wanting to do 2FA more for your SFTP clients. I haven’t looked that hard for GUI clients that can cope with 2nd authentication, but the popular Windows client, WinSCP, works very well. Unfortunately the popular Linux client, Filezilla, does not handle the 2nd authentication so I always do things from a terminal and CLI on my Linux clients. As for IOS, I haven’t looked for a compatible client.
Finally, if you’re really interested in SFTP, you may want to read my “How to make your own NAS” blog, which covers how to make an SFTP jail.